Film Composition


Music by Jesse Kruger. Image found on Flickr.com. Found on April 13, published on February 7th 2007.

Summary

In this project, I composed a short soundtrack for a scene of the film The Wind Rises. In this project we had to use garageband  (a software used to create music) to compose a soundtrack for an earthquake. I composed two separate parts of the scene. For the first part, I went for a dangerous sound and for the second part I went for a sad song.

Film with Composition

In this film I used the m6m chord for a feeling of danger that wasn’t very character based. I also used the M4m for a feeling of sadness and loss.
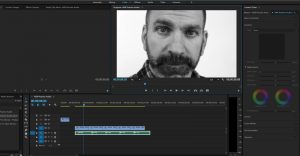
DAW Evidence

What I Learned and Problems I Solved

In this project, I learned how hard it is to be a composer. It is relatively easy to find out which chords to use but hard to come up with a melody. I learned how to use garageband and how to use it to compose music. I also learned what chords to use for different tones. At one point a few of my chords were in a place in the song that they shouldn’t have been in. I used garageband to edit out the individual notes to fix it.

Film Sound Design Project

Summary

In this project, we used sound ADR (Automated Dialog replacement) to replace the sounds in a clip from the movie The Wind Rises, with sounds that we generated in our school. We spent a few days “on a sound safari” while we collected our sounds then a few days editing.

Film Before Foley and Sound Effects

Film After Foley and Sound Effects

Sounds With Written Description

At the beginning of the film, the sound from the lave was made from multiple tracks of us shaking a garbage can and dumping legos out of a bin. The sound of the train breaking was me screeching. For the train steam I used the actual sound of steam coming from the dish washer in the Cafeteria. For the shot of the house falling off the cliff, I used the sound of me pushing over logs in the woods and rustling through the grass. For the electrical pops in the same shot I used the sound of two metal rulers clanking together. For the sound of the tiles falling off the roof of the houses, I used multiple tracks of legos falling. For the end scene with the people running out of the train I used multiple tracks of me running through grass and a track of a few people mumbling.

Sound Library

Here is the picture of the sound library I used to complete this project.

Sounds and Written Descriptions

I organized and labeled the files in my sound Library.

Audio Signal Chain Terms

  • Clean sound: sound that sounds clean and is most important in corporate industrial films (but is still very important in other films.
  • Audio Single Chain: A microphone converts sound into electricity. Current is carried down a cable and into an audio recorder where it is stored.
  • Double system set up: If you don’t have a professional camera you should use this one. Has better bit depth
  • Single system setup: Audio is fed into a single camera and recorded with an image. You don’t need to sync up the audio but doesn’t work very well if you don’t have a high quality camera.
  • Bit Depth: Number of different possible values of amplitude each sample can have
  • Preamp: A device than boosts a small electric signal for further amplification or processing.Foley and Sound Effects Terms
  • Clipped, the top of the digital audio wave being chopped off.(bad)
  • Headroom (way to avoid clipping): Line under the clipping point about -20 to -12 dbs from the top where most of the average sound volume.
  • Impedance: Measure of a devices resistance to an AC current.
  • Microphone placement: Sound dissipates according to the inverse square law. (Basically Mike needs to be as close as possible)

Foley and Sound Effects Terms

  • Foley: Footsteps, cloth props
  • Modern Foley breaks it down into even more catagories
  • Ambience: psychological cue for space/ the atmosphere of the place. Important to record before filming
  • Library Sound Effects: Prerecorded sound effects
  • Mics cannot pick up small sounds like scratches and they have to add the sounds in post production
  • Radio relies on sound effects to show what was going on
  • Music can be used for movement like in cartoons
  • Jack Foley Invented Foley


What I learned and Problems I Solved

In this project I learned how to use ADR and all about making sounds. I learned that many different sounds can sound better than the actual sound that you are trying to create. At one point I couldn’t make a good sound for the train breaking. I did not think that the sound we recorded was good enough so I really quickly made the sound and uploaded it.

Fundamentals of Sound in Post Production

Sound Brainstorm:

First shot, make a rumbling sound that kind of sounds like wind

for 0.17 make it the people screaming instead of the train

For 0.26-0.30 have people screaming and a few sounds of destruction

for 1.07 have only a couple people yelling

for 1.11 have lots of people yelling

make a bubbling sound with a few rumbles

have two large snaps for 0.32

0.14 make a wreee screech for the breaks

have a siren for 1.07

have a baby crying at 1.07

Use a metal thing to scrape across another metal object to make the wree sound

At 0.37 make a rattling sound of metal

At 0.37 have rumbling as well but faint

At 0.37 have the sound of gravel being poured but being faint

At 0.42 have the sound of gravel being poured loud at first fading out

at 0.52 at mumbling

at 0.52 have a couple screams

at 0.53 have steam

at 0.53 gave the sound of birds

at 1.09 have the sounds of glass breaking

at 1.09 have the sounds of people yelling

at 1.09 have the sound of grass being shuffled

ADR Project


Summary

Our film class did a project where we practiced ADR. We were given a clip of our teacher saying “I never said you stole the money”. The clip had poor audio and we were given the task of syncing the audio and the video of that clip and another with better audio.

Film Before Visual ADR

This is the film before ADR which means that it has poor sound quality.

Film After Visual ADR

This is the film after ADR which means it has better sound quality.

We’ve Got to Have Money

Mr. Le Duc wants money

ADR Process

This is a screenshot of me working on the project.


Audio ADR Preparation

The audio has been looped multiple times and I compared each piece of audio and visual to see which ones fit best.

ADR Terms

  • ADR: the process of prerecording the dialog in the studio to use over the footage.
  • This is done to replace bad voices like in musicals. First used at 1930’s.
  • Used dubbing to change language of some films.
  • Most dialog is recorded in post.
  • A lot of people used to think that ADR was bad.
  • Two common practices.
  • Visual ADR is when the actor can see the video and try to match it.
  • Audio ADR is when the actor matches the sound of the original audio.

Audio Post-production Terms

  • Sync: Synchronizing your video and audio
  • Audio: the sound in the film
  • Visual: the video in the film
  • Merge: merging your visual and audio together to create one synced video.

What I Learned and Problems I Solved


In this project I learned all about the process of ADR and how to sync video and audio. At first I did not understand the instructions on how to sync the video and the audio but I looked up a youtube video which showed me several methods on how to do so.

Chocolate! Film Post-Production

Summary

In this project I had to edit the footage of a film my classmates and I shot. First I sorted all of the shots into bins along with the sound effects. Next I synced up the audio. (The audio wasn’t really synced but they were all at similar spots.) Next I cut out the audio and footage I wasn’t going to use. After that I put an L cut at 0.05 and several more throughout the footage. Next I edited them together and fixed audio and color.

The Film Final Edit

What I Learned and Problems I Solved

Inn this project I learned how to create L and J cuts. I also established a creative workflow. I did’t show the visual when they were looking at the script and used different angles when they did.


Chocolate Director Pre-Production

Summary

For this project our class split up into groups and adapted the different roles of a production team to make a film. We were given the script and we had to make a story board from there. My role was the director. I was in charge of casting and studying/deciding how people should act in this film. I helped chose the genre and the style of the film. I decided what influences this film would have from other films. We decided to use the disrupted match cut for the end of the script when Chris is opening the chocolate bag.For the Visual Match cut we are going to show the bag of chocolate when Kirstin say “Do you love me?” We are going to use the TV lighting because our film will be parodying a soap opera which uses TV lighting

Film elements:

81. TV Lighting

49. Visual Match-Cut (Idea)

51. Disrupted Match-Cut

Explanation of the Film Vision

My vision for this is a satire of a soap opera. I envisioned similar angles and film techniques as a soap opera. I wanted to make this film because I wanted to become a better film maker and practice directing a script.


Target Audience

The target audience for this film is fourteen to eighteen year olds.


Genre/Style of Film

The genre of this film is comedy. I wanted it to be a satire of a soap opera. Do do this I researched a blog post by HarriWhelan called Analysis of 3 soap operas at wordpress.com. This post explored film techniques in several soap operas such as closeups, shot-reverse shot, not having many high angle/ low angle shots and beginning your shot tilting upwards to the room mid conversation (Although I don’t think I’m going to use this one). Here is the link to the blog post.

Analysis of 3 soap operas


Influences from Other Films

This film was influenced by soap opera camera techniques such as shot reverse shots like in Coronation Street and Emerdale.

Consultations with Production Team

I had several talks with the production team during this project. The first of which was me asking the cinematographer if we could change the story board from having mainly  wide shots to having closeups to it would look more like a soap opera. I also consulted with the sound designer to tell him where we scouted when he was absent. I talked with the entire production team about what film elements we should include in our summary.

Location Scouting

We scouted out several film locations for this project. We wanted a location with a lot of light but not to much. We needed some kind of door and space for a table and a place with not many people walking through so they wouldn’t be bothered. Here are the shots we took to test the lighting and how people looked at the location. We listened for ambient sound and we heard some which was good for the film.

Casting Decisions

We are not sure what groups will be assigned to be the actors in our film but the requirements for playing Kristen is that she has to be a girl and the requirement for playing Chris is that he has to be a boy.


Scheduling

Day 1: Got the script and made a rough draft of the storyboard

Day 2:Production team started the final draft of the story board

Day 3:Production team finished final draft of the storyboard and made blog post.

Day 4: Finished the sections Genre/Style of Film Influences from Other Films, Target Audience and explanation of the film vision for the pre production blog post.

Day 5: Scouted out film locations with film cinematographer and decided what camera settings to use on the camera. Finished section location scouting.

Day 6:Finished Summary section

Day 7: Finished Pre Production Blog Post.

What I learned and Problems I Solved

I learned all about the pre-production roles for a director in this project. I learned how to cast people in films, some filming techniques of soap operas and several elements of film. After a few days into the project I realized that the film needed to be part of a genre so I chose soap opera. Then I realized that the angles weren’t influenced by  soap operas so I revised it so it had more closeups.


Editing an Interveiw

Summary

In this project we all used are knowledge of editing to edit an interview using only four days of editing, resources on YouTube, the raw footage of an interview, some small films and premiere pro.

Terms and Concepts

This is a list of new terms I had to memorize in this project.

The Morph Cut: A visual effect that helps to bridge the gap between two cuts

B-Roll: A second camera angle or entire film to play over a boring visual moment without audio.

Audio Gain: The Audio adjusting setting

A-Roll: The main shot of your scene or film

SoundCloud: A music website


Collating Files and Storyboard

Here are the Notes of what I did each day

Day 1: Watched the interview and picked out the questions I wanted.

Day 2: Edited out all but three questions and started editing out ums and ahs.

Day 3: Edited out Ums and ahs and started adding B-Roll

Day 4:Added B-Roll and added titles

Day 5: Added Music, Credits and adjusted audio before exporting.

In this project I made a checklist and took daily notes on another blog post to keep myself organized.

Notes:

Question 1:

Where does your inspiration come from . 1:56

I am currently at 3:36

What do you get out of it and why do you do it 3:36

How do approach filming an evil character 22:16

Day 2: Remember to add the homeless man B roll for the first question

Where is the second question

Day 3: Remember to add music

List:

Add Music

Edit out the other questions

Edit out Ums and Ahs

Adjust audio

Add title

Add B Roll

Add Credits

These Are my paper notes

Notes

Project Skills Evidence

What I Learned

This project forced me to be creative and plan out how I was going to edit an interview. I had to learn how to cut, zoom it, add titles, adjust audio, and add B-Roll. At first I didn’t know how to adjust audio but I used trial and error to figure it out.

Walter Murch Editing Tips

(e)Motion

  • Motion Pictures + Montage = Cinema
  • How does the cut to the shot make the audience feel and how good is the story telling.
  • The(e)motion pictures are the most important element
  • Make rough selections of the b=-roll
  • If the A camera has no sound you can add sound from the B camera
  • requires co-op

Story

when somebody is walking cut after the foot lifts up

when somebody is mad cut when the foot comes down

Rhythm

Is the cut happening at the right time and does it have the right rhythm

Is the shot too long or too little

Blinking is cutting to another shot or saving

break film into 20 minute  chunks  for editing

Eye-Trace

Where the audiences eye is looking during the film

2D plane of screen (180 degrees rule)

The idea that the 3D world is being represented on the 2D movie screen

3D Continuity and Spelling

Where are the people in the space being represented

Art of the Interview – Citizen Kane Project

Summary

The goal of this film was to work together as a group to prove that we are capable of doing the different roles of a film production team and to analyze and explain what we learned from researching the first scene of Citizen Kane. First we spent a week taking notes on the first scene alone. After we became familiar with the film we started to analyze the film in depth on out own. After we were done we established groups based on which scene we had. We split into the different roles of a film production team and spent a week creating a short film about the first scene in Citizen Kane.

The Film

Camera Settings

As you can see for this project we kept the camera on Manual so we could change the shutter speed ourselves. We used a shallow depth of field because she was really close to the camera. Our ISO was on 800 for medium brightness because we had lots on lights on set. We left the rest of the settings on default because the video looked good without changing them.

Lighting

In this film we used soft light.

As you can see, none of Emily’s face has shadow on it. I chose this to try to create soft lighting. We used the ceiling lights from above and a light aiming up at her face from down below to create even lighting. However she does look pale because I should have used an orange light filter.

Reactions to the Final Version

Dzung: The lighting was even, too close to the person in frame, and the person was set at eye level in the film. Overall, it was good for the first time filming.

Natalie: The lighting was even, but use a warm light for a warmer skin tone look. The interviewee looked very pale because of lighting. The camera angle was good because I know you shot from farther away, however the interviewee was very close to the camera. Overall good use of putting the camera at eye level and good lighting.

What I learned and Problems I Solved

In this project I learned how to film someone in an interview. I learned which shot looks best (medium shot) and how to set up the lights to create soft light (have lights coming from below and above. During this project solved a few minor problems. During shooting Emily was holding up the script and reading it. I got the idea to have her try to memorize most of her lines. Also at first we set up the lights up high and had the ceiling lights on. This created a low key lighting effect so I decided to set the camera up down low to create fill lighting.